Making your Domain Name from GoDaddy work as DDNS using RaspberryPi

Tech Enthusiast
RaspberryPi is a credit card sized powerhouse capable of hosting a web server, doing home automation and much more. With everything going online these days and skyrocketing bills of server hosting providers, the only way to get your presence online is by hosting your website yourself. Sure, that sounds simple but how do I get www.somewebsite.com to use my ever changing Dynamic IP Address assigned to my home router by my ISP? In comes, DDNS to save the day!
Alright! But what the hell is DDNS? Good question. A simple Google Search for What is DDNS would result in the following:
Dynamic DNS (DDNS or DynDNS) is a method of automatically updating a name server in the Domain Name System (DNS), often in real time, with the active DDNSconfiguration of its configured hostnames, addresses or other information. The term is used to describe two different concepts.
OK what?!
Right! That's too much tech jargon to take in for one day. Let's simplify it.
DDNS is way of making sure that whenever your ISP provides you with a new IP, you update the pointer of www.somewebsite.com to use that IP Address instead of the old one, thus making sure your site is always online.
That made sense right! Its simple and with a bit of code magic we can make sure this happens automatically every few minutes. So let's jump right in!
Prerequisites:
- Your purchased domain name from GoDaddy (we'll use www.somewebsite.com for this post)
- A RaspberryPi (any model as long as its working)
- Python Packages installed (godaddypy and requests)
- Port forwarding on your router port 80 to your RaspberryPi (Google for Port forwarding web server in router)
- Presence of mind
Once you have this all, we're good to go!
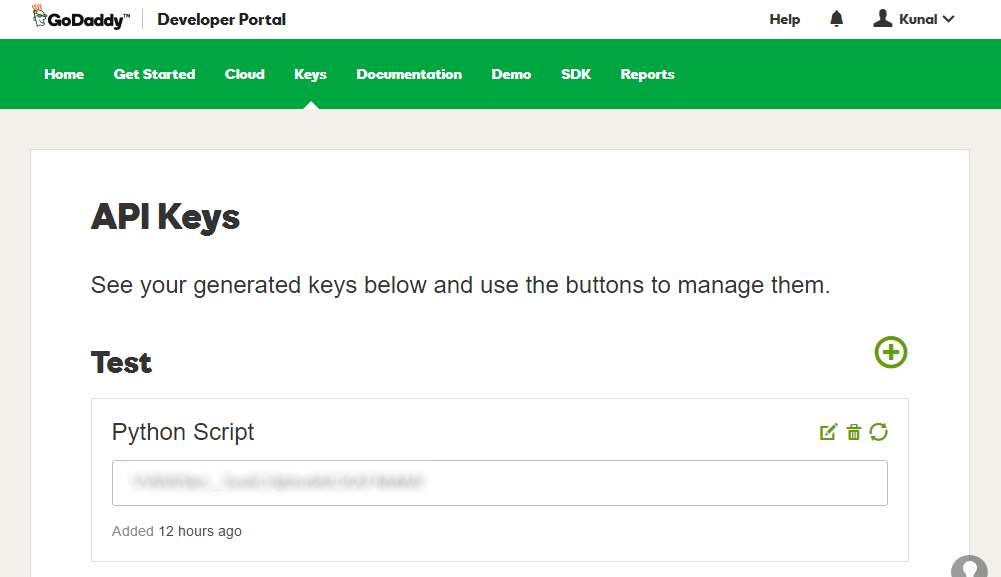
Let's start by logging into the Developer panel of GoDaddy to generate some authentication tokens for our script. Open https://developer.godaddy.com/keys/ in your browser. It looks something like this:
Scroll down to find the Production section, and click the Big Plus Sign on its right. You should see a popup dialog like below:
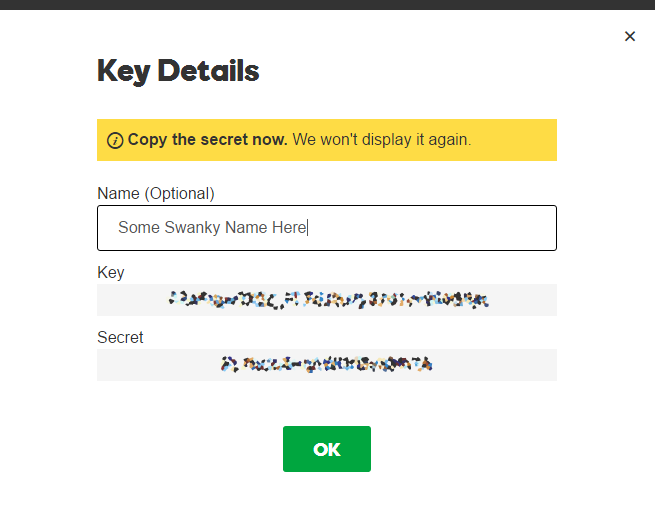
Pay heed to the big yellow info box in the dialog above, copy the Key and Secret and store it somewhere safe, if lost, you'll have to generate a new pair again. With that done, you can log out from GoDaddy.
Now SSH into your RaspberryPi and let's start coding. The python script is just 20 lines of code, here's the code for it:
from godaddypy import Client, Account
from datetime import datetime
import json, requests

c = requests.get("http://jsonip.com").content
current_ip = json.loads(c)\['ip'\]

key = 'paste key from godaddy here'
secret = 'paste secret from godaddy here'
my_acct = Account(api_key = key, api_secret = secret)
client = Client(my_acct)

domain = "somewebsite.com"
subdomain = "@"

# @ will be your primary/main domain as defined in Godaddy DNS settings.
# If you need to update any subdomain, say for blog.somewebsite.com, replace "@" with "blog"

current_record = client.get_records(domain, record_type='A', name=subdomain)
domain_ip = current_record\[0\]\['data'\]

if domain_ip == current_ip:
    print "%s Nothing to be done" % datetime.now()
else:
    print "%s Current IP has changed" % datetime.now()
    print "%s Old IP: %s - New IP: %s" % (datetime.now(), domain_ip, current_ip)
    result = client.update_record_ip(current_ip, domain, subdomain, "A")
    print "%s %s" % (datetime.now(), result)
The script basically performs the following tasks:
- Using http://jsonip.com it gets your current public IP
- It logs in to your GoDaddy Account using the API Keys and gets the current A record for somewebsite.com
- It compares if your current public IP has changed from the record
- If not, it just prints it out on the console and exits
- If the IP has changed, it updates the A record against the domain name
Save the python script above to any location you want, preferably the home folder of the user pi:
/home/pi/updater.py
Now edit your crontab using the command "crontab -e" and paste the following line:
\*/5 \* \* \* \* /usr/bin/python /home/pi/updater.py >> /home/pi/updater.log 2>&1
What this will do is, every 5 minutes run the python script and append the output of each run to /home/pi/updater.log
That's it!
Now even if your Public IP gets changed, within 5 mins the new IP will get updated against the A record of your domain name.
Now its easy to run a website off your RaspberryPi in a cost effective manner without having to pay hundreds of dollars for server hosting and static IPs.
Let me know your experience in the comment section below. Feedback, suggestions are always welcome!